
Welcome back! This week on Unreal Adventures, I learn a bit more about crafting lighting that looks good and play around with blueprints a bit more.
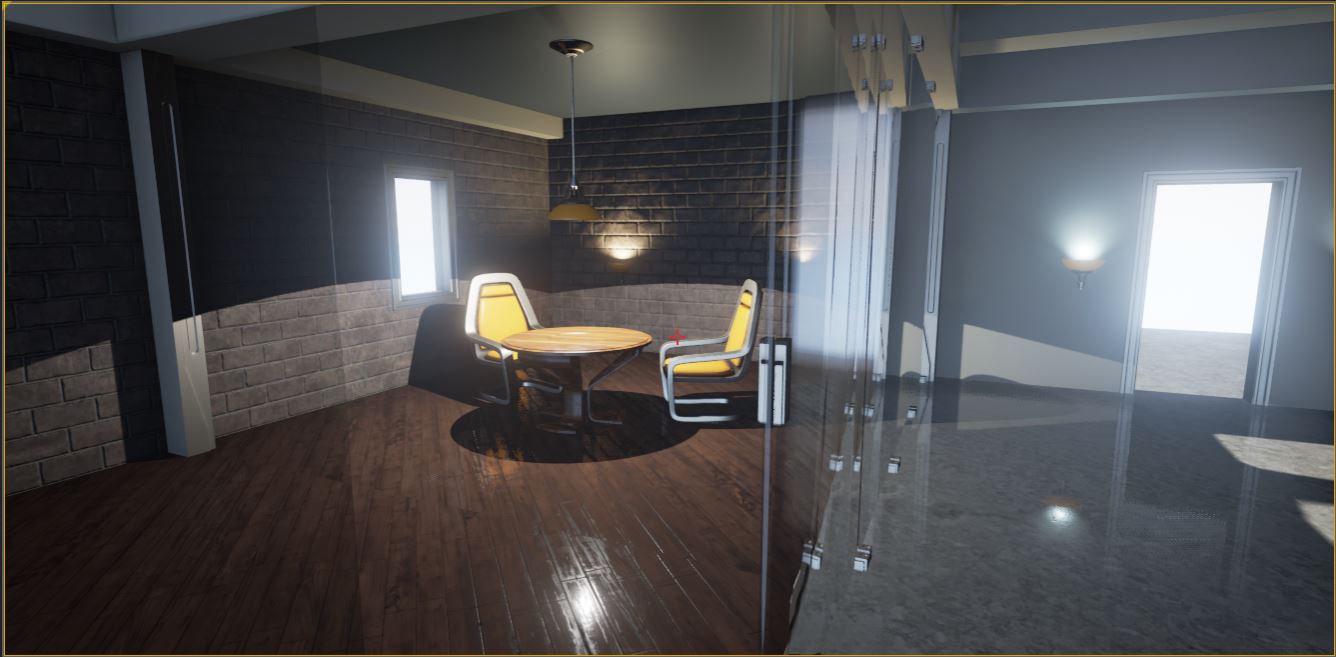
Fist things first, we’d built a nice office and now we need somewhere to sit. Luckily Unreal Engine has a table and chair in the starter props to help with this. On to the main objective: lights. There are a few blueprint lights, such as a wall sconce and a hanging ceiling light. For this setting the wall sconce seems best so I arranged a few across the wall.

Next up was reflections. The chairs and table legs are metallic and the player should see some nice reflections of those lights and the glass we have set up. This is done with a sphere reflection object. The first shot here is with preview quality lighting, without reflections. The second shot is production quality lighting with reflections. The difference is a bit subtle, but it’s something that, as a player, I love to see developers add. It’s also a lot more noticeable when you’re actually moving around the scene.


Then, for fun, we told the engine to simulate physics on the chairs and tables. Since this level is being built from a “first person” starter project we have the built in ability to “shoot” these odd projectiles that will help us make sure the physics are working. They are!

Next up, visual scripting! AKA blueprinting. We already did this with the sliding door, but since I’m just following the order of the YouTube playlist, I’m actually going to be doing a simpler blueprint this time.

There you have it, simple right? What we want to do is make a blueprint that allows us to turn a light on and off. So I had to destroy my current ceiling light (it’s a blueprint class, so the point light that came with it could not function independently) and build my own out of a point light and the ceiling light prop. Once I made sure it would look nice in game, I turned the point lights rendering property off.

Now that the point light was it’s own item, I could mess with it through the blueprint. For this we have to create a reference to the blueprint. Once that’s done we drag a wire off that reference and create a ToggleVisibilty node that will turn the light on and off. Next, I had to find a way to have the pre-existing Event-BeginPlay from our last adventure trigger both our door location and the light toggle. After some Google-Fu, I found a flow control node called Sequence. This allows me to use our Event-BeginPlay node to trigger both of our processes.

This is sort of pointless as the player wouldn’t notice it’s off anyway, because the light turns on as soon as play begins. But for learning purposes, it’s a simple way to get an idea of how blueprinting works. Naturally, I did the more advanced door blueprint before this easier one. However, I hit play and kept the blueprint window open to show you the BeginPlay event firing (denoted by the small dots moving along the wire) and starting our other processes. Neat right? That view is also very useful for debugging and checking that you have the flow correct.

So now we’ve made a light that turns on when the game starts. But that’s not very useful as a play element, it would be much better to have it work with a trigger volume just like our door. In fact, I decided it would be easy enough to just use the trigger volume for the light as well. I hooked everything up using my new found sequence node and gave it a try.

As you may have guessed, that didn’t work as intended. That trigger box was made to cover a small area to make sure the door opened when you were close and closed when you weren’t. So the light would turn on when you opened the door, but as soon as you step through the door the light would turn off. Oops. So I created a new trigger box, and hooked everything up again.

This was much more successful and the light now comes on when you enter the door and stays on until you leave. Sweet!
But what if we want to create our own light that we can make different copies of? What if we want it to turn on and off when the player activates it? Blueprint time! I created a blueprint, borrowed the sconce prop from the starter content, and then added a light inside the blueprint editor. Just to make sure everything was going to work once I used the item, I placed one on the wall for another live point of reference while I edited inside the blueprint.


So that’s the basic layout. Now you can modify all sorts of attributes, including the inner and outer cone angle, intensity, and color. I lowered the intensity, widened the out cone, and changed the color. Purple is awesome. Next, I put in a point light and used it to fill in some of what the first light was missing. I made it red in the picture to show the area it covers that was missed by the first light.

After a bit of tweaking I was able to get the light just how I like it. I think it even looks better than the default light on the right.

The next natural step was to do like we did with the door before, and make the light turn on and off depending on if the character is in a trigger box or not. That setup is easy to create, and is actually the ground work for the more advanced player activation.
The first component we need to enable the player to toggle the light is a node called EnableInput, makes sense right? We also want a DisableInput node that we’ll hook up to the EndOverlap node so the player can’t toggle the light unless they are close to it. Now the enable and disable input nodes both need to be assigned to a player controller, so in our case we simply GetPlayerController and set that character as the target. Alright, so we’ve got the ToggleVisibility node to turn the light on and off, and we’ve got our player controller input enabled. Now we just define what key to listen for, which is as easy as right clicking the board and typing whichever key you want to use. This will become a key press event, and will be tied to the ToggleVisibility node to uh… toggle the visibility when the player presses F while in range of the light.


I also made a quick visibility toggle for that text, so the player only sees it when they’re close enough to toggle the light. Plus comments, those should be mandatory for helping others figure out what the heck you’re doing.

The whole point of this was to create a blueprint for an item that we could then reuse multiple times. So I dragged a few instances onto the wall to test and make sure it works like it should. The only issue I noticed is that the TriggerBox is a little wide and it can be hard to toggle the right light. You normally wouldn’t have a bunch of lights crammed this close together anyway, but you can also change the trigger box dimensions in the blueprint and it will change across all instances of that item. Pretty cool!

Okay, so all of this is pretty awesome and super useful. But what if we want to set up a bunch of lights using this blueprint and then tweak them individually? Construction script! The construction script fires when the object is constructed and whenever you make changes to the item in the blueprint. In this case we ant to change the color of the lights in the main editor rather than changing the whole blueprint.
So jumping over to the construction script we can see that there is a default node there already. This node is fired whenever you mess with anything contained in this blueprint. Just like the event graph, we can add some interesting stuff in here to expand the capability of the blueprint. First we need to add a reference to each of the lights, a SetLightColor node to make the change, and we also need a variable to hold our default light color. The variable can be added by simply right-clicking the “NewLightColor” line on the SetLightColor node and promoting that to a variable. Super easy.
Finally, we want to set the variable to editable so that we can mess with it outside of the blueprint and without needing to adjust our two separate light sources.


Now when we select our light instance out in the main game editor, we have the option to change the light color for our instances individually.
So let’s use this construction script to add another functionality. We already have the light set so it can be toggled by the player, but what if we want it on by default and still allow the player to toggle it. Or, from a design perspective, what if we want to be able to see the changes we’re making to the light color without jumping into play mode and toggling it every time we change the color. Science, that’s how. Or more construction script stuff, either way works.
For this functionality, we’ll need to create a new boolean variable (which is the default variable data type), give it a proper name, and create a SetVisibility node to hook everything in to. Once you have everything arranged right and have made the variable editable, we save and compile the script and head back out to the level viewport.


Now we can toggle our light on and off to make sure we like the color before we commit to it, or use it to leave the lights on rather than making the player turn them on.
So that’s how we build a blueprint and expand it from boring and basic to super useful. I’ve learned some pretty neat stuff from these videos, and I’m only on video 32 of 100+ so there is definitely more to come. One of these days I may even have a working game, see you next time!